
 Instant Quote
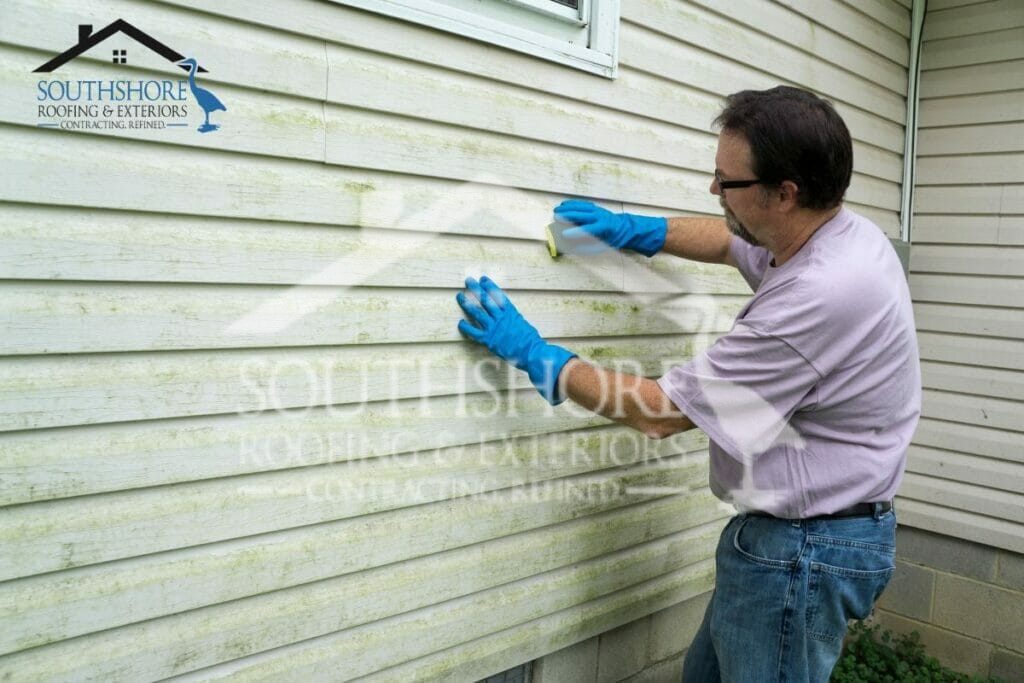
Spring and fall are the best times to give your home a good cleaning and prepare it for the changing weather. But before you start scrubbing and scouring, be careful not to damage your vinyl siding. Some common practices, like pressure washing and using harsh chemicals, can actually do more harm than good. Many vinyl siding manufacturer advise against pressure washing and using certain harmful chemicals.
Being a siding expert at SouthShore Roofing & Exteriors, I always guide homeowners toward their best home maintenance options. Taking the correct actions is crucial to avoid potential damage and costly repairs. In this blog post, I’ll explain the steps and recommend the best products to clean vinyl siding.
How to Clean Vinyl Siding Without a Pressure Washer
Pressure washing is commonly used for cleaning various surfaces, but it’s important to note that this method is not recommended for cleaning vinyl siding. While vinyl is a tough material, pressure washing can cause water to slip behind the panels, leading to mold growth, structural damage, and loosening of the siding panels.
Here are the steps to clean your vinyl siding the right way:
Step 1: Gather All the Tools and Materials
Make sure you have all your tools, materials, and gear in one place to avoid hassle and wasting time once you begin cleaning. Make a checklist with the following items in it:
- Waterproofing tarp, to cover the area beneath the siding
- Garden hose with a spray nozzle
- Brush with a long handle and soft bristles
- A Large bucket
- Vinyl siding cleaning solutions
- A ladder
- Rubber gloves, to avoid skin irritation from the cleaning solution
- A hard hat, to protect your head if you’re climbing to a certain height
- Eyeglasses, to avoid contact with dirt, debris, or solution.
Step 2: Prepare the Area and Ensure Safety
Clear away any furniture or plants near the house siding to create a free workspace. Make sure to cover the area with a waterproof tarp to avoid slippery surfaces and damage to the landscaping.
Step 3: Remove Loose Dirt and Debris
Using a soft-bristle brush, gently scrub the vinyl siding to loosen and remove any loose dirt, cobwebs, or debris. Start from the top and work your way down, ensuring that you cover the entire area. Take care not to scrub too vigorously to avoid scratching the vinyl boards.
Step 4: Mix the Cleaning Solution
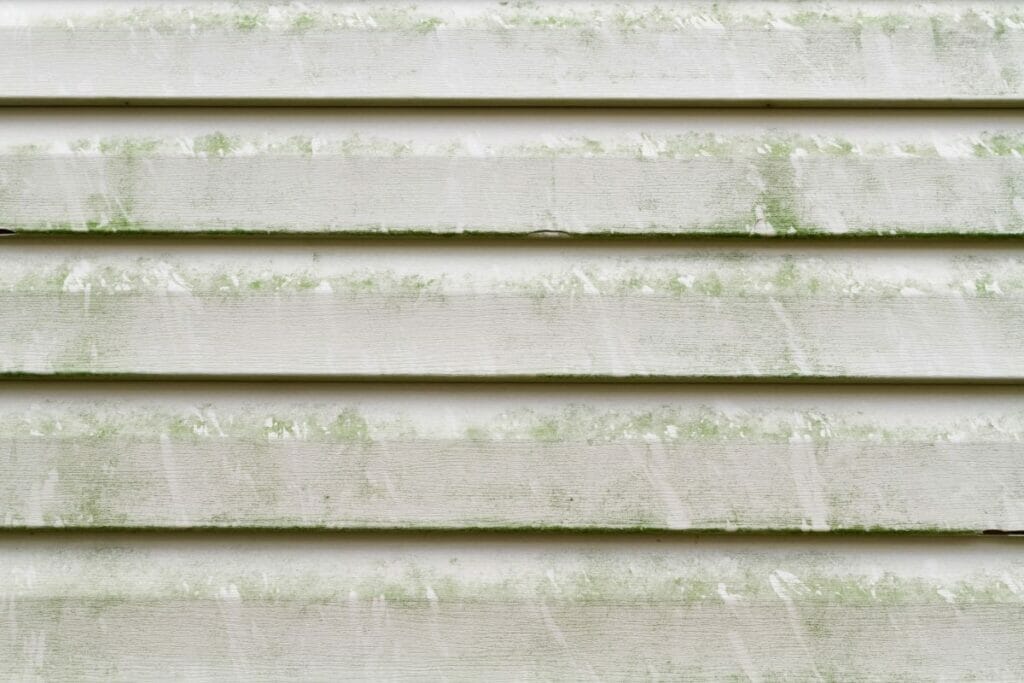
Now, it’s time to clean stubborn stains. Fill a bucket with water, add your cleaning solution, and mix it well. But what should you use to clean vinyl siding? Luckily, there are a few options out there for vinyl siding cleaners.
You can buy vinyl siding cleaners product developed specifically for cleaning vinyl siding or make one at home. I recommend the two products listed below:
- Mold Armor E-Z House Wash: This is a concentrated cleaner that is designed to remove dirt, grime, mold, and mildew from vinyl siding. This cleaner is biodegradable and safe to use on all types of vinyl siding panels.
- Forget Moss Mold Mildew & Algae Stain Remover: This is a non-toxic, water-based stain remover to clean moss, mold, mildew, and algae from vinyl siding. It is easy to apply and does not require scrubbing.
To create a solution at home by yourself, you need to mix the right ingredients in the correct amount. Here’s one of the best homemade solutions for cleaning vinyl siding with moss and algae stains:
- 1 gallon of warm water
- 1 cup of white vinegar
- 1 tablespoon of dish soap
Step 5: Apply the Solution to Your Vinyl Siding
Dip the soft-bristle brush into the vinyl siding cleaning solution, scrub the siding in small sections, and apply light pressure. This will help break down any remaining dirt or stains on the surface. Repeat the process if necessary.
For those challenging stains, using a non-scrubbing solution can save you considerable time and effort. Simply apply this solution, and then let it sit for a while. After leaving it for a while, gently rinse the siding with water, either from a hose or bucket. This process should effectively remove the solution, along with the accumulated dirt, moss, and algae.
Step 6: Final Inspection and Maintenance
Once you finish cleaning, take a step back and inspect the entire siding for any missed spots or areas that may require additional attention. If you notice any signs of damage during cleaning, such as cracks or loose panels, it’s crucial to call a siding contractor for repairs.
With the help of these steps, you can clean vinyl siding effectively without a pressure washer. With that being said, it’s equally important to know which chemicals and tools can damage vinyl siding, so you can avoid using them.
What To Avoid When Cleaning Vinyl Siding
Along with using a high-powered pressure washer, there are a lot of tools, homemade solutions, and industrial chemicals that can cause damage to vinyl siding boards. Make a note of the items below, and avoid them at all costs:
#1 Harsh Abrasives and Scrub Brushes
Avoid using abrasive materials like stiff brushes, steel wool, or abrasive cleaning pads. These can scratch and dull the surface of the vinyl siding, making it more prone to dirt accumulation and reducing its aesthetic appeal.
#2 Bleach and Abrasive Chemicals
Bleach and abrasive chemical cleaners may seem like powerful options for removing stains and dirt, but they can cause discoloration, color fading, and even spoil the siding. These harsh chemicals can also harm surrounding vegetation if not used properly. Opt for gentler cleaning solutions specifically formulated for vinyl siding.
#3 Solvents, Paint Thinners, and Ammonia-Based Chemicals
Solvents like acetone or paint thinner can dissolve and damage vinyl siding. Additionally, avoid products containing ammonia when cleaning your vinyl siding. Ammonia can cause discoloration and damage to the vinyl material over time. Research products, their ingredients, and the brand before purchasing.
#4 Excessive Heat
Avoid using high-temperature water or heat sources on vinyl siding, such as steam cleaners. The heat can warp or distort the siding, causing permanent damage. Stick to using normal or lukewarm water for cleaning.
#5 Incorrect Mixing Ratios
When you’re diluting the cleaning solution you’ve purchased, don’t forget to follow the manufacturer’s instructions regarding dilution ratios and safety. Using a higher concentration than recommended can lead to chemical reactions that damage the vinyl siding or leave behind residue.
By avoiding these potentially harmful methods, products, and ingredients, you can clean your vinyl siding effectively. Remember, regular cleaning and inspection will help preserve the appearance and durability of your vinyl siding, keeping it looking fresh and beautiful for years to come!
On average, vinyl siding can protect your home for 30 years. After that, cleaning and painting may not help extend its lifespan or repair the damage. At that time, you’ll need a professional siding contractor to inspect it and conduct necessary repairs and replacements. Delaying the repairs can affect the adjacent construction materials, leading to their quick deterioration.
Read our blog on some exciting vinyl siding trends for more information.
If you need help with the maintenance, repair, and replacement of your home’s siding, you can reach out to our team at SouthShore Roofing & Exteriors for trusted results.
Free Consultation and Estimate on Vinyl Siding
At SouthShore Roofing & Exteriors, we understand the importance of making informed decisions when it comes to your home. That’s why we offer our expertise and guidance as a complimentary service to all homeowners in Florida. If you need guidance and service from a reliable siding contractor in Tampa or the surrounding area, call us at (813) 400-3329. We’ll be happy to help you with a free consultation or with cleaning vinyl siding so that you have all the information you need before making any commitments.
Related Articles
-
 April 8, 2025How Long Should Vinyl Siding Last: Factors, Lifespan & MoreDiscover how to maximize the lifespan of your vinyl siding. Learn how long it should last and how to keep it looking great.
 -
 August 2, 2024The Top Vinyl Siding Trends: What’s New and ExcitingThe exterior of your home is the first thing that catches the eye of people passing by and sets the tone for your property’s overall aesthetic. One of the most significant aspects of your home’s exterior is its siding. The siding is the protective covering surrounding your home that shields it from external elements and […]
 -
 May 16, 2025Can You Repair Vinyl Siding Without Replacing It?Can vinyl siding be repaired without replacement? Discover cost-effective fixes and tips to enhance your home's look.
Protect Your Home with Expert Roofing
Don’t wait for leaks or storm damage to cause costly repairs. Our experienced roofing team provides fast, reliable service, high-quality materials, and lasting results. Ensure your home stays safe, secure, and looking great—contact us today for a free estimate.


