
 Instant Quote
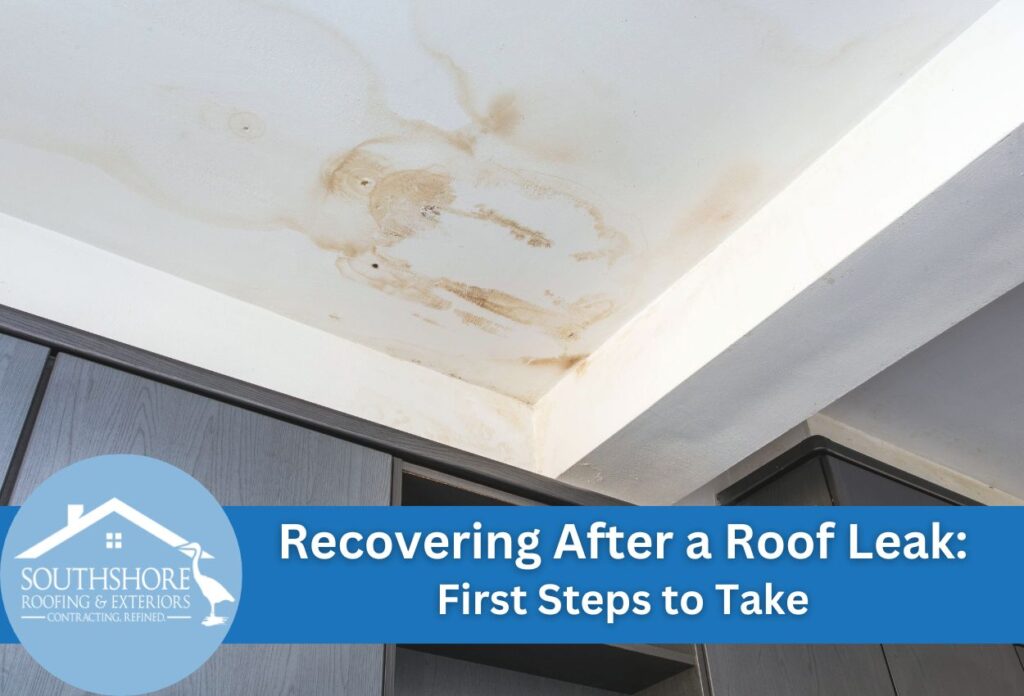
Discovering a roof leak can be a homeowner’s nightmare, but quick action can minimize the damage and prevent long-term issues. As a homeowner in Tampa, FL, it’s important to understand the urgency of roof leaks. When water infiltrates your home, it’s not just about the immediate mess, it’s about protecting your property from further harm and ensuring your family’s safety. This guide will walk you through the first steps to take when cleaning up after a roof leak, focusing on safety assessments and temporary containment measures.
Before diving into cleanup efforts, think about your safety. Water and electricity don’t mix, so assessing potential electrical hazards is your first task. Additionally, you’ll need to evaluate the structural integrity of affected areas to make sure it’s safe to proceed. Once you’ve confirmed it’s safe to act, the next step is to limit water spread and move your belongings. By following these initial steps, you’ll be better equipped to handle the aftermath of a roof leak and pave the way for effective water damage restoration, mold prevention, and necessary repairs.
Step #1: Water Damage Assessment and Documentation
After ensuring safety and containing the leak, the next step is to assess and document the water damage. This process is crucial for both immediate cleanup efforts and potential insurance claims. Start by identifying all affected areas, including walls, ceilings, floors, and personal belongings. Look for signs of water staining, discoloration, or warping. Don’t forget to check less obvious spaces like closets, cabinets, and the attic, as water can travel in unexpected paths.
Once you’ve identified the damaged areas, it’s time to document everything thoroughly. Take clear, well-lit photographs of all affected items and structural elements. These visual records will be helpful for insurance purposes and can help guide your restoration efforts. Create a detailed inventory of damaged personal items, noting their condition and estimated value. This documentation is essential for water damage restoration claims and can help expedite the process with your insurance company.
It’s important to be as comprehensive as possible during the roof leak assessment. Don’t overlook any minor damage, as even small issues can lead to significant problems like mold growth if left unaddressed. By thoroughly assessing and documenting the damage, you’re setting the stage for effective cleanup, repair, and potential compensation for your losses.
Step #2: Dry and Dehumidify the Affected Areas
After assessing and documenting the water damage, begin drying and dehumidifying the affected areas. This process is vital for preventing mold growth and further structural damage.
Start by maximizing airflow in the affected areas. Open windows and doors to create cross-ventilation, which helps moisture evaporate more quickly. If weather permits, use fans to circulate air and speed up the drying process. Position fans strategically to direct air towards damp surfaces and corners where moisture tends to linger.
Dehumidifiers can also help lower moisture levels effectively. Place them in the center of the affected rooms so they have enough space for proper air circulation and empty the water collection tanks regularly. For larger areas or severe water damage, consider renting industrial-grade dehumidifiers for more efficient moisture removal.
Pay special attention to hidden spaces like wall cavities and attics, where moisture can accumulate unnoticed. If insulation has been affected, it may need to be removed and replaced to prevent mold growth. Remember, thorough drying is key to successful water damage restoration and mold prevention, protecting your home’s integrity and your family’s health.
Step #3: Tackling Ceiling and Attic Restoration
When dealing with the aftermath of a roof leak, taking care of ceiling and attic damage is crucial to prevent long-term issues. The first step in this process is safely removing damaged materials like wet drywall and insulation. These materials can quickly become breeding grounds for mold and compromise your home’s structural integrity if left untreated.
Begin by carefully removing any saturated drywall, taking care not to disturb surrounding areas. Wet insulation should also be removed, as it loses its effectiveness once damp and can harbor moisture, leading to mold growth. Properly disposing of these materials to prevent health hazards. Next, inspect the wooden structures in your attic and ceiling area. Look for signs of water damage, such as discoloration, warping, or softness. Treating these wooden elements is vital to prevent rot and maintain the structural integrity of your home.
During this process, it’s important to keep the attic at the forefront of your restoration efforts. Thoroughly examine all areas for hidden damage or potential weak spots that could lead to future leaks. By taking care of damaged materials, you’re not just cleaning up after a roof leak, you’re taking the first steps in water damage restoration and mold prevention.
Step #4: Implementing Mold Prevention Strategies
After addressing the immediate aftermath of a roof leak, it’s time to focus on mold prevention strategies. The humid Tampa climate creates ideal conditions for mold growth, making proactive measures essential. The first step in mold prevention is to identify potential growth areas like hidden moisture spots that may have been overlooked during initial cleanup efforts.
Start by thoroughly inspecting areas adjacent to the leak site, including wall cavities, baseboards, and flooring. Use moisture meters to detect dampness in seemingly dry surfaces. Pay special attention to dark, warm spaces where mold thrives, such as closets and behind furniture. Once you’ve identified potential problem areas, it’s time to apply mold-resistant treatments. These treatments shield against future outbreaks, providing an extra layer of protection for your home.
Consider applying mold-inhibiting paints or primers to affected walls and ceilings after they’ve completely dried. For wooden structures in attics or crawl spaces, use borate-based products that prevent mold and wood rot. Remember, while these treatments are effective, they’re not a substitute for addressing the root cause of moisture. Ensure your roof is properly repaired and ventilation is sufficient to prevent future leaks and moisture buildup. By implementing these mold prevention strategies, you’re taking a crucial step to protect your home from the long-term effects of water damage.
When to Schedule a Mold Remediation Evaluation
When mold growth becomes extensive following a roof leak, it’s important to recognize when professional intervention is necessary. Mold can quickly spread in humid climates, often requiring specialized remediation. If you notice widespread mold growth, particularly in hard-to-reach areas or across porous materials, it’s time to consider professional help.
Seeking out mold remediation companies that specialize in water damage from roof leaks is essential for effective treatment. These experts have the tools and knowledge to address not just visible mold, but also hidden growth within walls or insulation. They can perform thorough assessments, including air quality tests, to determine the full extent of the problem. Professional remediation means mold is completely eradicated, reducing the risk of recurrence and protecting your home’s structural integrity.
When selecting a mold remediation service, look for companies with experience in roof leak-related issues. They should be familiar with attic inspections and understand the challenges of water damage in roofing structures. By scheduling professional mold remediation when necessary, you’re ensuring the long-term health and safety of your home.
Step #5: Repair and Restore Damaged Surfaces
Once your home is dry and secure, the focus shifts to repairing and restoring damaged surfaces. This step in the water damage restoration process involves both aesthetic improvements and structural repairs.
Patching and painting affected walls and ceilings can restore the aesthetics of your home. Begin by carefully removing any remaining damaged drywall or plaster. Once the area is clean and dry, apply new drywall or plaster patches for a smooth finish. After the repairs have cured, prime and paint the area to match the surrounding surfaces. This not only improves the appearance but also helps seal the repaired areas against future moisture intrusion.
Taking care of flooring concerns is equally important, especially when it comes to salvaging carpets and hardwood floors. For carpets, professional cleaning and drying may be sufficient if done immediately. However, if mold has set in, replacement might be necessary. Hardwood floors require special attention as cupping or warping may occur due to water exposure. In some cases, sanding and refinishing can restore hardwood floors, but severe damage may necessitate partial or complete replacement. These surface repairs aren’t just about cleaning up after a roof leak, they’re also restoring your home to its pre-damage condition and preventing future issues.
Preventing Future Leaks: Roof Maintenance Tips
Taking steps to maintain your roof is important to prevent future leaks and ensure long-term protection for your home. Regular roof inspections are a key component of preventive maintenance.
During a roof inspection, look for signs of wear and tear such as cracked or missing shingles, damaged flashing, or areas of sagging. Look closely at chimneys, vents, and skylights, as these areas are common leak points. Regular cleaning of gutters and downspouts is also essential to prevent water buildup and maintain proper drainage.
While some maintenance tasks can be done by homeowners, it’s important to know when to call in professional roofing services. Complex issues like structural damage, extensive shingle replacement, or suspected leaks in hard-to-reach areas require expert attention. Professional roofers have the skills, tools, and safety equipment to fix these issues effectively. By combining regular inspections with professional repairs, you can extend the life of your roof and protect your home from future water damage and the need for extensive restoration.
Professional Roofing Services for Leak Prevention
If you’ve been grappling with the challenges of a roof leak, making sure it doesn’t happen again is vital. Regular maintenance and expert assessments are key in preventing future leaks and extensive damage. At SouthShore Roofing & Exteriors, we specialize in identifying and repairing vulnerable areas of your roof before they lead to major issues. Don’t wait for the next heavy rain to find out if your roof is at risk.
Call SouthShore Roofing & Exteriors at (813) 400-3329 to schedule a comprehensive roof inspection. Our experienced professionals are ready to provide top-notch roofing services that not only address immediate repairs but also help maintain the longevity and safety of your roof. Secure your home against the elements and avoid the hassle of water damage restoration, mold prevention, and ceiling repairs. Take action today to protect your home for tomorrow.
Related Articles
-
 January 15, 2025Navigating Roofing Disasters: Your Essential Tampa Roofing Emergency GuideFacing a Tampa roofing emergency? Discover expert tips for storm damage roof repair and leak fixes. Don't let a roofing crisis catch you off guard.
 -
 April 9, 2025Understanding Emergency Roof Leak Repair ServicesLooking for quick roof leak repair? Explore immediate solutions and expert tips to prevent further damage. Call now for emergency assistance!
 -
 July 28, 2025Can a Roof Leak Be Fixed From the Inside?When water starts dripping from your ceiling during a heavy rainstorm, an immediate question homeowners may have is often whether they can fix the roof leak from inside the home. While interior repairs seem like an easy fix, especially during Florida’s unpredictable weather, they’re rarely the complete solution homeowners hope for. Roof leaks typically require […]
Protect Your Home with Expert Roofing
Don’t wait for leaks or storm damage to cause costly repairs. Our experienced roofing team provides fast, reliable service, high-quality materials, and lasting results. Ensure your home stays safe, secure, and looking great—contact us today for a free estimate.


