Instant Quote
Hurricane clips strengthen the connection between your roof and your home’s structure, protecting against severe wind damage during storms. These metal connectors secure roof trusses or rafters directly to wall plates, preventing roof uplift that can lead to catastrophic failure during hurricanes. For homeowners in hurricane-prone regions, installing hurricane clips represents a critical upgrade that enhances structural safety while potentially reducing insurance premiums.
Understanding the installation process, material options, and maintenance requirements helps property owners make informed decisions about this important roof reinforcement. Professional installation ensures hurricane clips meet building codes and provide maximum protection when severe weather strikes.
What Are Hurricane Clips and How Do They Work?
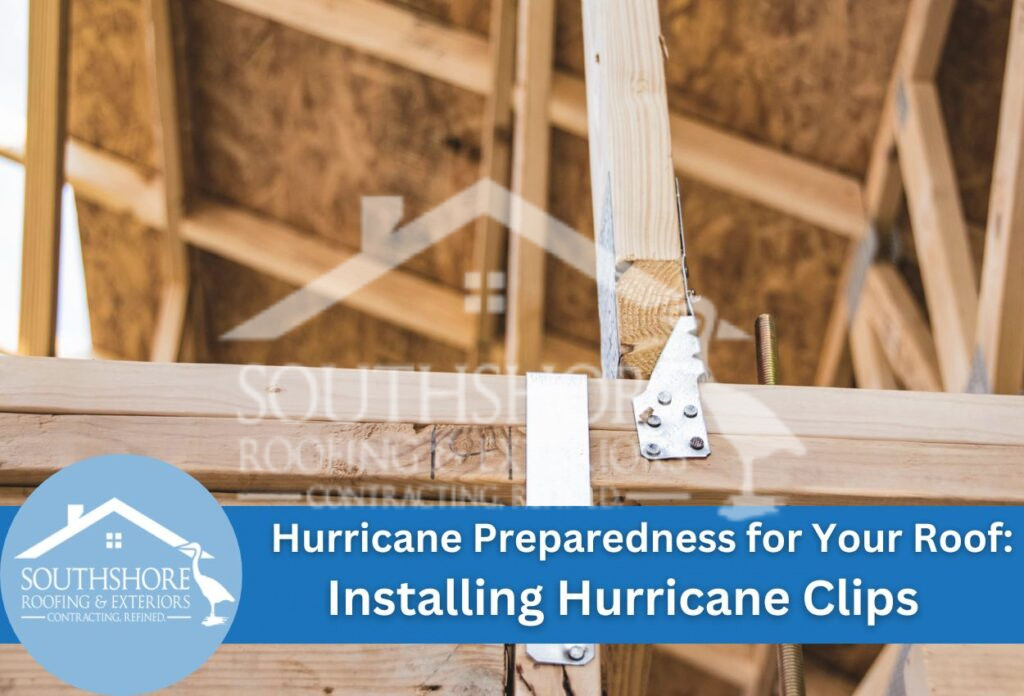
Hurricane clips are metal connectors that secure roof framing members to the top plates of exterior walls. Made from galvanized steel or stainless steel, these clips create a continuous load path from the roof down through the walls to the foundation. During high winds, roofs experience significant uplift forces—hurricane clips counteract these forces by mechanically fastening the roof structure in place rather than relying solely on gravity and nails.
Common Hurricane Clip Types:
| Type | Design | Best Application |
|---|---|---|
| H1 clips | Single wrap design | Standard truss-to-wall connections |
| H2.5 clips | Double wrap with reinforcement | Higher wind zones, heavier roof loads |
| H3 clips | Triple wrap design | Maximum wind protection, coastal areas |
| H10 clips | Heavy-duty with multiple fastening points | Commercial applications, extreme wind zones |
The clips function by distributing wind loads across multiple fastening points. Each hurricane clip uses specialized nails or screws that penetrate both the roof truss and the wall plate, creating a mechanical connection far stronger than traditional toe-nailing alone. This continuous connection prevents the progressive failure that occurs when individual connections fail during sustained high winds.
Different building codes require specific clip ratings based on regional wind speeds and exposure categories. The roofing materials you use may also influence which hurricane clip specifications your local building department mandates. Consulting with experienced contractors ensures your home receives appropriate protection for its specific risk profile.
Benefits Beyond Storm Protection
Installing hurricane clips delivers advantages that extend well beyond wind resistance. Insurance companies recognize the reduced risk these connectors provide, with many carriers offering premium discounts ranging from 10-40% for homes equipped with properly installed hurricane clips. This financial benefit often offsets installation costs within 3-5 years while continuing to save money over the home’s lifetime.
Key Advantages of Hurricane Clip Installation:
- Structural integrity improvements that protect against multiple hazard types
- Potential insurance premium reductions up to 40%
- Increased property value and marketability
- Peace of mind during hurricane season
- Compliance with updated building codes
- Reduced risk of total roof loss during severe weather
Property values benefit from hurricane clip installation, particularly in coastal real estate markets where buyers prioritize storm-resistant features. Homes with documented wind mitigation improvements command higher prices and sell faster than comparable properties without these upgrades. Real estate appraisers increasingly recognize hurricane clips as value-adding improvements rather than basic maintenance.
The structural benefits extend to everyday weather protection. Hurricane clips reduce roof movement during ordinary windstorms, preventing nail pops, shingle damage, and progressive deterioration that occurs when roofs shift against their framing. This stability extends roof lifespan while reducing maintenance costs over time. For residential roofing systems, the investment in hurricane clips pays dividends through multiple pathways beyond just hurricane protection.
Should You Install Hurricane Clips Yourself?
Installing hurricane clips requires accessing the connection point between roof trusses and wall plates—a challenging location on existing roofs. Retrofit installations typically require removing portions of soffit, fascia, or interior ceiling materials to reach the critical connection points. This invasive work demands carpentry skills, proper safety equipment, and knowledge of structural requirements that most homeowners lack.
Professional Installation Advantages:
- Proper clip selection based on engineering requirements
- Correct fastener types and installation patterns
- Compliance with local building codes
- Safety equipment and fall protection systems
- Wind mitigation inspection certification
- Warranty protection for materials and labor
Building codes specify exact fastener schedules, clip spacing requirements, and installation techniques that vary by jurisdiction. Professional installers understand these requirements and ensure installations pass inspection—critical for obtaining insurance discounts and wind mitigation certifications. DIY installations often fail to meet code requirements, negating any potential insurance benefits while leaving homes vulnerable during storms.
The physical dangers of retrofit installation cannot be overstated. Working in confined attic spaces, on ladders, and at roof level creates fall hazards, heat exposure risks, and potential electrical contact with wiring. Professional contractors carry liability insurance, workers’ compensation coverage, and specialized safety equipment that protects both workers and homeowners from accident-related financial exposure.
Cost comparisons favor professional installation when factoring in equipment rental, material waste, time investment, and risk of improper installation requiring costly corrections. Professional contractors typically complete hurricane clip installation in 1-2 days, while DIY attempts often stretch over weeks with uncertain outcomes. For roof repair work involving structural connections, professional expertise proves invaluable.
Pre-Installation Assessment Essentials
Before installing hurricane clips, professional contractors conduct thorough structural assessments examining roof framing condition, connection accessibility, and existing damage. This evaluation identifies rotted wood, improper truss spacing, or previous repairs that might compromise hurricane clip effectiveness. Addressing these underlying issues before clip installation ensures the reinforcement system performs as designed during actual storm conditions.
Critical Assessment Factors:
| Component | What Inspectors Check | Why It Matters |
|---|---|---|
| Truss condition | Cracks, splits, rot, insect damage | Compromised wood won’t hold fasteners |
| Wall plate integrity | Solid wood, proper size, secure foundation connection | Clips need solid attachment points |
| Existing connections | Current fastening method, spacing, condition | Determines retrofit approach |
| Accessibility | Soffit access, attic space, working room | Affects installation method and cost |
| Building code | Current requirements, permit needs | Ensures legal compliance |
Accessibility challenges significantly impact installation approaches and costs. Some homes require extensive soffit removal to reach truss-to-wall connections, while others provide attic access that simplifies clip installation. Older homes may have closed soffits or low roof pitches that complicate access, requiring creative solutions or alternative reinforcement strategies. Professional contractors evaluate these factors during initial assessments, providing accurate quotes that reflect actual installation requirements.
Local building codes determine permit requirements for hurricane clip installation. Many jurisdictions require permits for structural modifications, including retrofit hurricane clip installations. Permitted work ensures proper inspection, creates documentation for insurance discounts, and protects homeowners from liability if installation defects cause storm damage. Working with licensed contractors familiar with local requirements streamlines the permitting process while ensuring code compliance.
Material selection during the assessment phase affects long-term performance. Coastal environments require stainless steel or specially coated clips that resist salt air corrosion, while inland installations may use standard galvanized hardware. Your contractor should specify appropriate materials based on your home’s location and exposure conditions, ensuring the investment provides decades of reliable protection.
Installation Process and Timeline
Professional hurricane clip installation follows systematic procedures that ensure structural integrity while minimizing disruption to occupied homes. The process typically begins with attic inspection and measurement, followed by soffit or ceiling access creation, clip installation, and restoration of removed materials. Experienced crews complete most residential installations within 1-2 days, though larger homes or complex roof designs may require additional time.
Typical Installation Sequence:
- Preparation phase – Protect interior spaces, set up safety equipment, create access points
- Structural assessment – Verify truss locations, measure spacing, identify any issues
- Access creation – Remove necessary soffit sections or ceiling materials
- Clip installation – Position clips, install fasteners per manufacturer specifications
- Quality verification – Check all connections, ensure proper fastener engagement
- Restoration work – Replace soffit materials, patch ceiling openings, clean work areas
- Final inspection – Document installation for wind mitigation certification
Each hurricane clip requires precise positioning at the truss-to-wall intersection. Contractors use specialized nail guns or impact drivers with specific fastener types rated for structural connections. The fastener schedule—number, type, and placement of nails or screws—follows engineering specifications that vary by clip model and wind zone requirements.
Working from both attic spaces and exterior ladder positions, installers ensure complete coverage across all roof framing members. Missing even a few clips creates weak points where failure can initiate during high winds. Professional installations include documentation showing clip locations and quantities, essential for wind mitigation inspections and insurance discounts.
The restoration phase returns your home to its original appearance. Quality contractors match soffit materials, paint touched-up areas, and ensure weather-tight seals around any penetrations created during installation. Proper restoration prevents moisture infiltration and maintains your home’s curb appeal while protecting the structural improvements.
For homes needing comprehensive roof replacement, hurricane clip installation becomes much simpler and less expensive. New construction or replacement scenarios provide direct access to truss-to-wall connections without requiring soffit removal or invasive access methods.
Wind Mitigation Inspections and Insurance Discounts
After hurricane clip installation, obtaining a wind mitigation inspection provides documented proof of improvements that qualify for insurance discounts. Licensed inspectors examine your roof’s wind-resistant features, including hurricane clips, and create official reports that insurance companies use to calculate premium reductions. These inspections typically cost $75-150 but generate savings that recoup this expense within the first policy year.
Wind Mitigation Report Components:
- Roof covering type and attachment method
- Roof deck attachment (including hurricane clips)
- Roof-to-wall connection strength
- Roof geometry and shape
- Secondary water resistance features
- Opening protection (impact-resistant windows, shutters)
Insurance companies apply tiered discount structures based on the level of wind mitigation features present. Homes with comprehensive improvements including hurricane clips, proper roof deck attachment, and impact-resistant coverings can receive maximum discounts. Even partial improvements generate meaningful premium reductions that continue throughout your ownership of the property.
The wind mitigation report provides transferable value when selling your home. Prospective buyers receive documented evidence of storm protection features, potentially reducing their insurance quotes and making your property more attractive compared to homes without these improvements. Real estate agents increasingly highlight wind mitigation features in listings, recognizing their importance to coastal buyers.
Maintaining current wind mitigation documentation requires periodic updates as you make additional improvements or replace aging components. If you later upgrade to impact-resistant windows or install a new roof with enhanced attachment methods, updating your wind mitigation inspection captures these improvements for additional insurance savings.
Maintenance and Long-Term Performance
Hurricane clips require minimal maintenance but benefit from periodic inspections that identify potential issues before storm season. Annual visual checks from attic spaces verify clips remain securely fastened without rust, bending, or fastener withdrawal. These inspections take minutes but provide assurance that your wind protection system maintains its integrity over time.
Maintenance Schedule and Warning Signs:
| Inspection Item | Frequency | Concerning Signs |
|---|---|---|
| Visual clip condition | Annually | Rust, corrosion, paint failure on clips |
| Fastener security | Annually | Protruding nails, loose screws, gaps |
| Wood condition | Annually | Cracks around clips, splitting, moisture stains |
| After storms | Following wind events | Shifted clips, new gaps, structural movement |
Coastal environments accelerate corrosion on metal components, requiring more frequent inspection of hurricane clips exposed to salt air. Stainless steel clips resist corrosion better than galvanized options, but all metal connectors benefit from monitoring. Surface rust on clip faces doesn’t necessarily indicate structural compromise, but rust jacking around fasteners or significant metal degradation warrants professional evaluation.
Wood deterioration around hurricane clips creates installation failure even when the clips themselves remain intact. Water infiltration from roof leaks or condensation can rot the truss ends or wall plates that clips depend on for strength. Addressing moisture sources promptly preserves both your roofing system and the hurricane clip connections that protect it. Regular roof inspection catches these issues early.
If you notice any concerning conditions during your inspections, consulting a roofing contractor experienced with hurricane mitigation ensures proper evaluation. Some issues require immediate attention while others simply need monitoring. Professional assessment distinguishes between cosmetic concerns and structural problems requiring corrective action.
Hurricane clips installed properly provide decades of reliable service with minimal intervention. Unlike many home systems requiring frequent maintenance or replacement, these structural connectors continue protecting your home year after year with only occasional verification of their continued integrity. This durability makes hurricane clip installation one of the most cost-effective long-term improvements available to homeowners in hurricane-prone regions.
Protecting your home from hurricane damage starts with proper roof-to-wall connections. SouthShore Roofing & Exteriors provides professional hurricane clip installation that meets building codes while qualifying for insurance discounts. Our experienced team handles assessment, installation, and wind mitigation certification, ensuring your home receives maximum storm protection. Contact SouthShore Roofing & Exteriors to schedule your hurricane clip evaluation and strengthen your home’s defense against severe weather.