813-400-3329
 Instant Quote
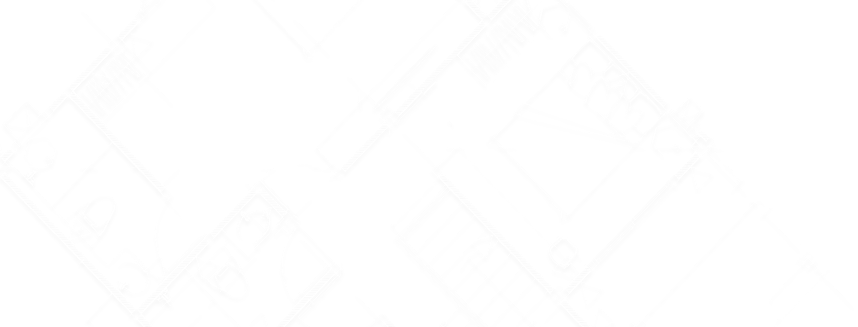

Have you ever looked up at your roof and marveled at the classic elegance of its shingles? This roofing material is undeniably popular, gracing homes in Tampa with exceptional appeal. However, beneath their beauty lies a common challenge: the presence of roof moss.
At first, roof moss might seem harmless, almost like a natural decoration on your home. Yet, it poses a significant threat, especially to asphalt shingles. In this guide, we’ll take a closer look at this green intruder and, more importantly, explore practical ways to prevent and remove it.
So, if you’re a homeowner concerned about your roof’s well being, or are simply curious about how to maintain your shingles, stick around.
What Is Roof Moss?
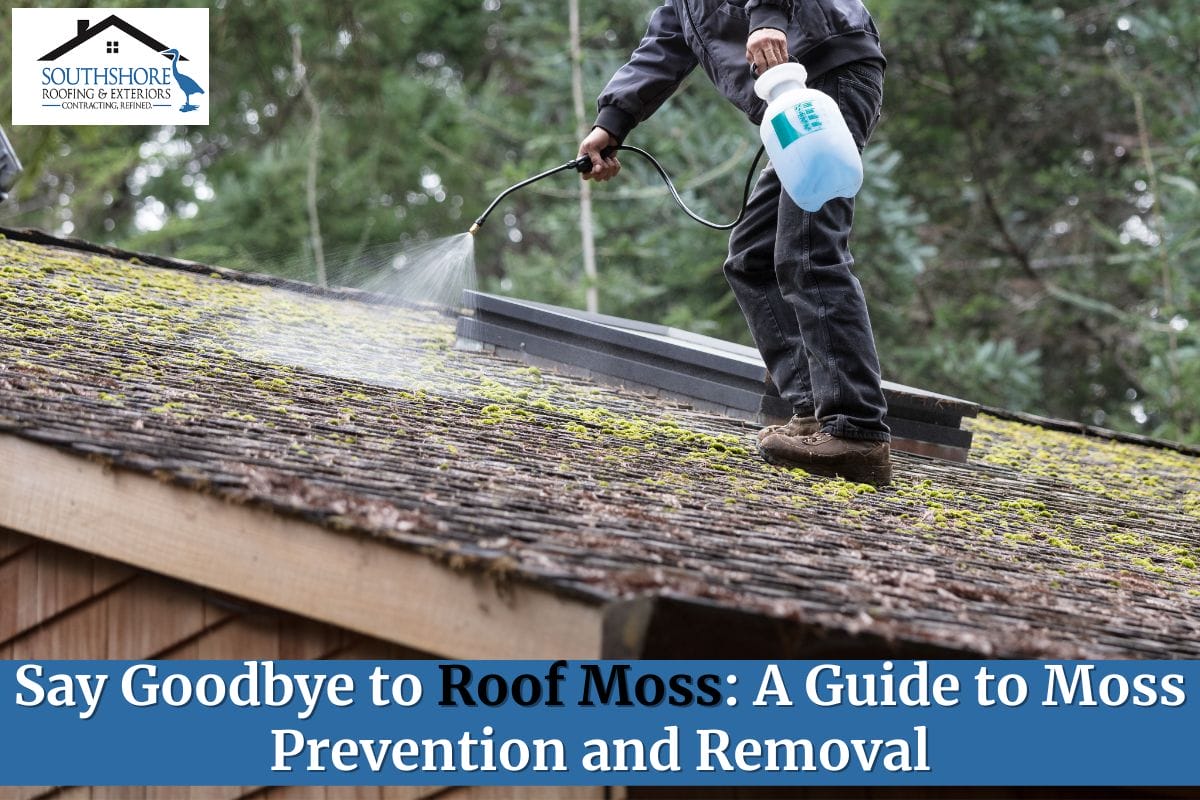
Roof moss isn’t necessarily the same as your average garden variety moss. It’s a type of plant that thrives in damp, shaded environments. Unlike most plants, moss doesn’t have roots to draw nutrients from the ground. Instead, it absorbs nutrients and moisture directly from the atmosphere and whatever it’s growing on – in this case, your roof.
Not all roof moss is the same, and each type has unique characteristics and appearances. Understanding the types helps you identify and tackle them effectively. For example, hypnum moss is a low, carpet like moss that spreads quickly, covering large areas of the roof and retaining moisture.
Dangers Of Moss Growth On A Roof
Water Damage
Moss retains moisture, leading to rot and water damage beneath the shingles. This can weaken your roof’s structure and necessitate costly repairs.
Weakened Roof Structure
Moss can lift shingles, creating gaps for water infiltration. This weakens adhesives, making your roof more vulnerable to wind damage, especially during storms.
Reduced Lifespan of Roofing Materials
Moss accelerates the degradation of roofing materials like shingles, shortening their lifespan and requiring premature replacement. Moisture trapped by moss also impairs insulation, leading to decreased energy efficiency. Over time, this strains HVAC systems, increasing energy bills and repair costs.
Health Hazards
Moss can harbor pests, insects, and mold, adversely affecting indoor air quality and posing health risks, especially for individuals with respiratory issues.
Factors Contributing to the Growth of Roof Moss
Understanding the factors that contribute to roof moss growth is essential for prevention. Here’s a breakdown:
Climate:
Mosses thrive in regions with high humidity and frequent rainfall. Areas prone to fog or consistently overcast conditions provide the ideal environment for moss to flourish.
Shade:
Moss is a shade loving plant. If your roof is shaded by trees or nearby structures, it creates a perfect habitat for moss to settle and grow.
Surface Material:
Certain roofing materials are more susceptible to moss growth. Asphalt shingles, for instance, provide a suitable surface for moss to attach itself.
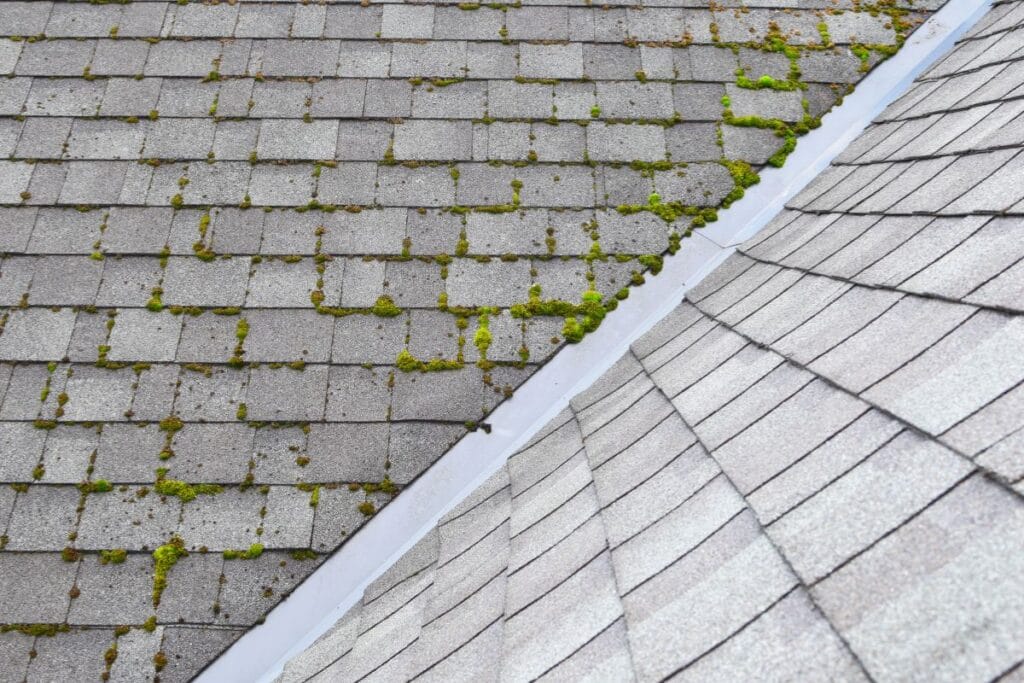
How To Remove Moss From A Roof
Roof moss, once it finds a home on your roof, can be remarkably stubborn. However, there are several effective methods for its removal. Each method requires careful consideration, especially regarding the type of roofing material you have and the extent of the moss growth.
Safety First: Gather Your Tools and Protective Gear
Before you start cleaning your roof, assemble the necessary tools and safety equipment. You’ll need a sturdy ladder, a soft bristle brush or broom, a garden hose with a spray nozzle, a long handled scrub brush, and a moss killing solution (options include a mixture of equal parts water and vinegar or a commercial moss killer).
Don’t forget to prioritize your safety. Wear non-slip shoes, gloves, and safety goggles to protect yourself from both the moss and the cleaning solution.
Clear Debris: Remove Loose Moss and Leaves
When you climb up your roof you will notice that moss is likely not the only excess material you will be dealing with. There are chances that your roof will also be covered in dust and debris.
Begin by clearing any loose moss and debris from your roof using a soft bristle brush or broom. Make sure to clean out the gutters and downspouts too, as clogged drainage can exacerbate moss growth.
Apply Moss Killer: Treat the Affected Areas
Now that you have cleaned your roof and removed the debris and loose moss, it is time to move to the most important part of the process: applying the moss killing solution to remove moss from the roof.
Now, you have two options: you can either create your own solution or rely on chemical methods to kill moss. Below we will go over both types so you can decide which one suits your needs better.
Commercial Moss Killers:
Commercial moss killers are readily available at hardware stores and are formulated specifically to eliminate moss efficiently. They often come in liquid or granular form, each with a unique application method.
DIY Moss Killers:
If you prefer natural or homemade solutions, you can create an effective moss killer using common household ingredients. One popular DIY moss killer consists of vinegar and water. Here’s how you can make it:
Vinegar and Water Solution:
Mix equal parts of white vinegar and water in a large spray bottle. Vinegar’s acidic nature makes it an excellent moss killer. The solution is safe for your roof and the environment, but it may require a bit more effort to remove stubborn moss growth.
Note: Regardless of whether you choose a commercial moss killer or a DIY solution, always follow the manufacturer’s instructions, or the proportions recommended for your homemade mixture.
Scrub the Roof: Remove Stubborn Moss
Wait until the moss has absorbed the moss killer. After this, take out a long handled scrub brush to gently scrub the affected areas.
Be careful not to use excessive force, as you don’t want to damage the roofing materials underneath. Use a gentle back and forth motion to lift the moss from the surface.
Rinse Thoroughly: Wash Away Residue
After applying the moss killer and scrubbing the affected areas, it’s crucial to rinse your roof thoroughly to wash away any remaining solution. A residue free roof not only looks better but also ensures that the cleaning solution doesn’t continue to interact with your roofing material, potentially causing damage over time.
Use a garden hose with a spray nozzle to rinse the surface of the roof. Start from the top and work your way down, ensuring that you cover all the areas where the moss killer was applied. Pay close attention to crevices and corners where residue might accumulate.
While rinsing the roof, don’t forget about your gutters and downspouts. Moss and cleaning solution residue can accumulate here, leading to clogs and drainage issues.
Prevent Future Moss Growth On Your Shingle Roof In Tampa
Preventing moss from regrowing is just as important as removing it. After you’ve successfully cleaned your roof there are chances that the mold and mildew growth might reappear, especially in Tampa where the humidity is quite high. Below are some preventative measures you can take:
Installing Zinc/Copper Stips Beneath The Ridge
Installing zinc or copper strips along the ridge of your roof is an effective long term solution. These metals naturally prevent moss growth. When it rains, small amounts of zinc or copper dissolve and wash down the roof, creating an environment where moss can’t thrive. Over time, this discourages moss from returning, keeping your roof clear. If you’re uncomfortable with DIY installation, you can hire a professional to ensure the strips are correctly placed.
Maintain Proper Ventilation In The Attic
Ensuring proper ventilation in your attic is crucial. A well ventilated roof allows air to circulate, keeping the roof’s surface dry and less conducive to moss growth. Consider installing ridge vents, soffit vents, or attic fans to maintain consistent airflow.
Sunlight Exposure
Moss thrives in shaded areas where sunlight is limited. Trim overhanging branches and clear debris to allow sunlight to reach your roof. If significant shade is unavoidable due to nearby structures, consult with a roofing contractor to discuss your options.
Regular Cleaning and Maintenance
Last but not least comes regular roof cleaning and maintenance. This small practice is not only essential in preventing moss growth but also helps maintain the overall health of your roof.
Keep your roof clear of debris like leaves, twigs, and branches. Clean out the gutter and gutter guards, if you have them, to ensure proper drainage, preventing water from pooling on your roof.
We recommend cleaning your roof every six months. If you want a more focused approach, you can contact our team for our roof rejuvenation services.
Keep Your Roof Free From Unsightly Moss! Contact Us Today
Regular roof inspections by professionals at SouthShore Roofing & Exteriors can identify and address potential moss growth before it becomes a problem for you and your home. Our roofing experts can spot early signs of moss and provide targeted treatments or recommend preventive measures tailored to your roof’s specific needs.
Our roof rejuvenation process involves repairing and restoring the condition of your roof. We also utilize essential oils that improve the look as well as the flexibility of your shingles. Contact us today at (813) 400-3329 to learn more.